How Long To Boil Eggs: Your Ultimate Guide to Perfect Soft, Jammy & Hard Eggs Every Time
Boiling an egg might seem like a simple task, but achieving that ideal consistency – whether it's a wonderfully runny yolk for dipping toast, a lusciously jammy center for ramen, or a firm, creamy yolk for salads – often feels like a culinary enigma. We've all been there: cracking open what we hoped would be a perfect soft-boiled egg, only to find a solid yolk, or anticipating a hard-boiled delight and discovering it's still too gooey. The secret, it turns out, lies in precise timing and a few simple, foolproof techniques.
This comprehensive guide will demystify the art of the perfect boiled egg on the stove. We'll break down exactly
how long to boil eggs to achieve your desired doneness, from just-set whites to fully firm yolks, ensuring delicious results every single time. Get ready to master one of the most versatile and beloved foods in your kitchen!
The Foolproof Method for Perfectly Boiled Eggs
Before we delve into specific timings, let's establish a foundational method that guarantees success regardless of your preferred yolk consistency. This process minimizes cracking, ensures even cooking, and makes peeling a breeze.
- Prepare Your Pot and Water: Choose a pot large enough so your eggs can sit in a single layer without crowding. Add enough cold water to completely cover the eggs by at least 1 inch for six or fewer eggs, or 2 inches for six or more. Starting with cold water allows the eggs to heat up gradually, reducing the risk of cracking.
- Bring to a Boil, Then Simmer: Place the pot over high heat and bring the water to a rolling boil. Once boiling vigorously, immediately reduce the heat to a steady, rolling simmer. This gentler heat is crucial for preventing the eggs from bouncing around and cracking against each other or the pot.
- Gently Lower the Eggs: Using a slotted spoon, carefully lower your eggs into the simmering water. Avoid dropping them in, as this can cause them to crack. Ensure they remain in a single layer to cook evenly.
- Start Your Timer: This is the most critical step for achieving your desired doneness. As soon as the last egg enters the water, start your timer for the duration specified below.
- The Essential Ice Bath: Once your timer goes off, immediately transfer the eggs from the hot water to a large bowl filled with ice water (or place them under very cold running water). This immediate chilling process is non-negotiable for several reasons:
- Halts Cooking: It instantly stops the cooking process, preventing overcooked eggs and that undesirable greenish-gray ring around the yolk.
- Aids Peeling: The rapid temperature change causes the egg white to contract, separating it from the shell membrane, making peeling significantly easier.
Leave the eggs in the ice bath for at least 5-10 minutes to cool completely.
- Effortless Peeling: For the easiest peeling, crack the cooled egg gently on a hard surface, then roll it back and forth to create fine fractures all over the shell. Peel the egg under cold running water or in the ice bath, starting from the wider bottom end where the air pocket is located. This typically makes the shell lift away with ease.
How Long to Boil Eggs for Your Desired Consistency
Now for the timings! These durations are based on large eggs (about 2 oz or 57g) starting from cold water, then simmering. If you're using medium or extra-large eggs, you might need to adjust by 30-60 seconds accordingly.
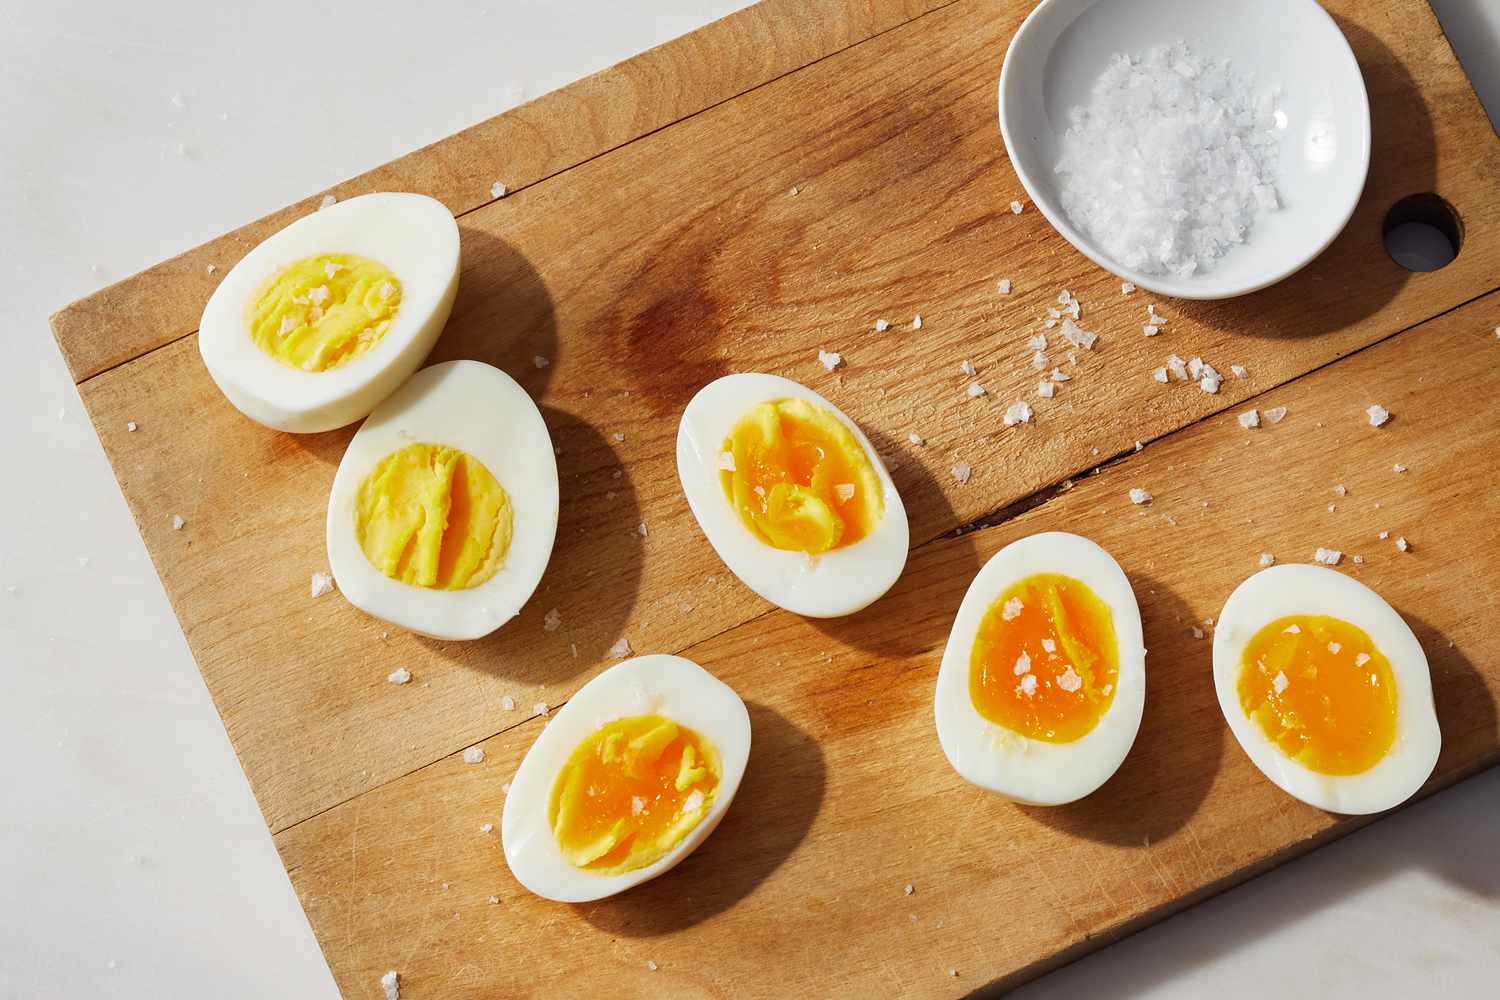
Soft-Boiled Eggs (Runny Yolk Bliss)
These are the darlings of breakfast, perfect for dipping toast "soldiers," enjoying over avocado toast, or as a delicate topping for soups. The whites are tender, and the yolk ranges from wonderfully runny to thick and luscious.
- 4 ½ Minutes: The whites are just set, while the yolk remains super runny and vibrant. Ideal for those who love a barely cooked yolk for ultimate dippability.
- 5 Minutes: You'll get a soft-set white with a thick, wonderfully runny yolk. This is often considered the classic "dippy egg," holding its shape well while still oozing golden goodness.
- 6 Minutes: The white is fully set, and the yolk transforms into a thick, beautiful "jammy" consistency – still slightly runny but with a delightful, almost custardy texture. This is the go-to for ramen, noodle dishes, or grain bowls, adding a rich, creamy element that elevates the entire meal.
Medium-Boiled Eggs (Creamy Perfection)
A versatile middle ground, medium-boiled eggs offer a fully set white with a creamy, rich yolk that's no longer runny but hasn't reached a firm, crumbly stage. They're excellent as a protein-packed snack or sliced into salads.
- 7 Minutes: The egg white is completely set, and the yolk is thick and barely, barely runny in the very center. It's a great option if you're transitioning from soft to harder yolks.
- 8-9 Minutes: At this stage, the yolk is fully set but remains wonderfully creamy and moist throughout. It's a fantastic choice for those who appreciate a less liquid yolk without the dryness sometimes associated with hard-boiled eggs. These are often preferred for slicing onto sandwiches or as a standalone snack.
Hard-Boiled Eggs (Solid & Versatile)
The workhorses of the egg world, hard-boiled eggs are incredibly versatile for meal prep, salads, sandwiches, and deviled eggs. The yolk is entirely set, ranging from tender to firm.
- 10-11 Minutes: The yolk is fully set and firm, but still has a slightly tender quality and a bright yellow hue. This is the sweet spot for many who enjoy a classic hard-boiled egg without any risk of being undercooked.
- 12-13 Minutes: For a completely firm, solid yolk that's ideal for mashing into egg salad or creating perfectly structured deviled eggs, aim for this timeframe. The yolk will be fully cooked through and slightly drier, making it easier to work with for recipes where a crumbly texture is desired. Remember, the ice bath is particularly important here to prevent the dreaded greenish-gray ring around the yolk, a sign of overcooking due to sulfur in the egg reacting with iron.
Pro Tips for Boiled Egg Success
Mastering
how long to boil eggs is just one piece of the puzzle. Here are some additional insights and tips to ensure perfect results every time:
- Egg Freshness Matters (for Peeling): Counterintuitively, slightly older eggs (about a week to 10 days old) are much easier to peel than very fresh ones. Over time, the air pocket at the large end of the egg expands, and the pH of the egg white changes, making it less adherent to the shell membrane.
- Egg Temperature: The timings provided assume you are starting with cold eggs directly from the refrigerator, which is the most common practice and provides more consistent results. If you're using room-temperature eggs, you might need to slightly reduce the cooking time by 30-60 seconds.
- Don't Overcrowd the Pot: Always ensure your eggs are in a single layer in the pot. Overcrowding can lead to uneven cooking and can cause eggs to crack as they jostle against each other.
- Adjust for Altitude: If you live at a high altitude (above 3,000 feet), water boils at a lower temperature. This means you'll need to increase your boiling time by an extra minute or two for every 1,000 feet above sea level to achieve the same doneness.
- Consider Egg Size: Our timings are optimized for large eggs. For medium eggs, reduce cooking time by 30 seconds; for extra-large or jumbo eggs, add 30-60 seconds.
- The Kettle Trick: For super quick boiled eggs, you can use a kettle to bring the water to a boil first, then transfer it to your pot before reducing to a simmer and adding the eggs. This shaves off a few minutes from the total process time.
- Experiment and Take Notes: Every stove is slightly different, and individual preferences vary. Don't be afraid to experiment with slight time adjustments and make notes on what works best for your setup and taste. For a deeper dive into achieving these perfect yolks consistently, explore our guide on Foolproof Boiled Eggs: Achieve Perfect Runny, Jammy, or Firm Yolks.
- Mastering the Stove Method: The stovetop remains one of the most reliable ways to boil eggs. If you're keen to refine your technique, our article Boil Eggs on Stove: Master Soft, Medium & Hard Egg Timings offers more focused insights on this traditional method.
Conclusion
No more guesswork or disappointing results! By understanding the fundamental method and paying close attention to specific timings, you now have the power to create perfectly boiled eggs tailored to your exact preferences. Whether you crave a velvety soft yolk, a luscious jammy center, or a reliably firm hard-boiled egg, the kitchen confidence you gain will open up a world of culinary possibilities. So go ahead, grab some eggs, set your timer, and enjoy the delicious satisfaction of a perfectly boiled egg, every single time.