Boil Eggs on Stove: Master Soft, Medium & Hard Egg Timings
There's a quiet satisfaction in cracking open a perfectly boiled egg – whether it's the molten gold of a runny yolk for dipping toast, the rich creaminess of a medium-boiled gem for a salad, or the firm, velvety texture of a hard-boiled egg ready for deviled eggs. Yet, achieving this ideal can sometimes feel like a culinary lottery. We've all been there: anticipating one result and discovering an interior that's either too soft or disappointingly firm. The good news? Mastering the art of boiling eggs on the stove is simpler than you might think, and it’s practically foolproof once you know the right technique and, crucially, understand
how long to boil eggs for your desired doneness.
This comprehensive guide will walk you through a tried-and-true method, providing precise timings for everything from barely-set whites with a liquid yolk to fully cooked, firm eggs. Prepare to banish those past disappointments and consistently create perfect boiled eggs every time.
The Foolproof Method: Boiling Eggs on Your Stovetop
Before we dive into the specific timings, let's establish the foundational method that ensures consistent results, prevents cracks, and makes peeling a breeze. This technique prioritizes control and immediate cooling, which are key to success.
- Choose Your Pot and Water: Select a saucepan large enough to hold your eggs in a single layer without overcrowding. Overcrowding can lead to uneven cooking and cracked shells. Add enough cold water to cover 6 or fewer eggs by about 1 inch, or 6+ eggs by 2 inches. This ensures even heat distribution.
- Bring to a Rolling Boil: Place the pot on high heat and bring the water to a vigorous rolling boil. Alternatively, you can use an electric kettle to boil the water first, then carefully transfer it to your saucepan.
- Gently Add Eggs: Reduce the heat to a steady, rolling simmer. Using a slotted spoon, carefully and gently lower each egg into the hot water. This gradual introduction minimizes the risk of cracking the shell from thermal shock. Remember, a single layer of eggs is crucial for even cooking.
- Start the Timer: Immediately upon adding the last egg, start your timer. This is the most critical step for achieving your preferred level of doneness. The timings below are based on this method – adding eggs to already simmering water.
- The Ice Bath is Essential: Once your timer goes off, use your slotted spoon to quickly transfer the cooked eggs from the hot water directly into a large bowl filled with ice water. Let them cool in this ice bath for at least 5-10 minutes. This immediate halt to the cooking process prevents overcooking (and that dreaded green ring around the yolk) and helps separate the membrane from the shell, making peeling significantly easier. You can also run them under cold tap water if an ice bath isn't immediately available, though an ice bath is superior.
- Peeling Perfection: For the easiest peeling, crack the cooled egg gently on a hard surface, then roll it back and forth to create numerous small fractures. Peel the egg under cold running water or submerged in the ice bath. Start peeling from the wider bottom end of the egg, where the air pocket is located.
Master the Timings: How Long to Boil Eggs for Your Perfect Yolk
Now for the heart of the matter: the exact timings that will unlock your desired egg texture. These times are guidelines, and slight variations can occur based on egg size, altitude, and stove heat. We recommend using large eggs for these timings.
Soft-Boiled and Jammy Eggs: The Runny Delight
Within this category, you'll find everything from barely-set whites with a gloriously liquid yolk to a beautifully firm white cradling a thick, jammy center. These are perfect for "egg & soldiers," atop avocado toast, or nestled into a bowl of ramen. For more detailed insights into achieving these delicate textures, consider reading our guide on
How Long To Boil Eggs: Perfect Soft, Jammy & Hard Eggs Guide.
- 4 ½ Minutes: At this precise timing, you'll achieve egg whites that are *just* set, still incredibly tender, with a super runny, vibrant yolk. This is ideal for dipping toast or enjoying a truly "dippy" egg experience.
- 5 Minutes: Expect soft-set whites that are fully cooked but delicate, encasing a thick, deliciously runny yolk. The yolk retains its bright orange hue, making it visually appealing and perfect for adding richness to any dish.
- 6 Minutes: This is the sweet spot for the popular "jammy" egg. The white is fully set and firm, while the yolk is thick, gloriously jammy, and slightly gooey – not quite runny, but definitely not firm. Jammy eggs are excellent in ramen, noodles, grain bowls, or as a flavorful addition to salads.
Medium-Boiled Eggs: Creamy Perfection
Medium-boiled eggs strike a wonderful balance, offering tender, fully cooked whites with a yolk that is creamy and rich but no longer runny. This versatility makes them suitable for most uses where you might reach for a hard-boiled egg, but with a more luxurious texture.
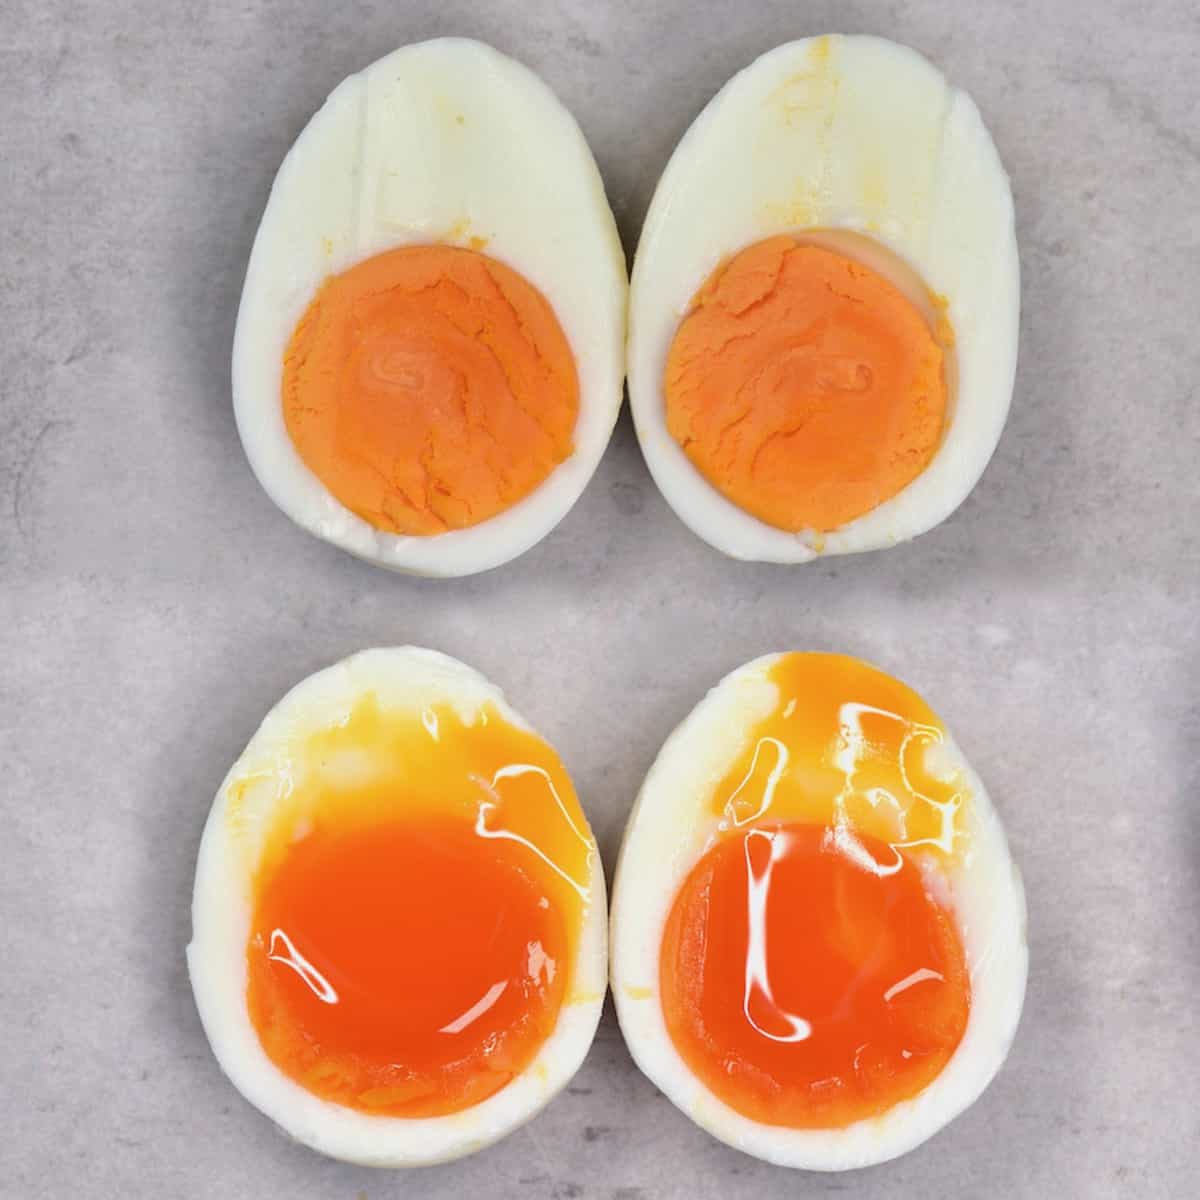
- 7 Minutes: At 7 minutes, your eggs will have fully set whites and a yolk that is thick and barely runny around the edges, with a creamy, deep orange center. It's a delightful bridge between jammy and firm.
- 8-9 Minutes: Within this range, the yolk will be fully set but still wonderfully creamy and smooth throughout. There will be no liquid, but the texture remains moist and decadent. These are fantastic for egg salads, sandwiches, or as a protein-packed snack where you appreciate a less firm yolk.
Hard-Boiled Eggs: Firm & Versatile
Hard-boiled eggs are the workhorses of the egg world – firm, fully cooked, and incredibly versatile. They are perfect for meal prep, salads, sandwiches, and the quintessential deviled eggs. To truly master every yolk texture, including these firm ones, check out our article on
Foolproof Boiled Eggs: Achieve Perfect Runny, Jammy, or Firm Yolks.
- 10-11 Minutes: For hard-boiled eggs with a yolk that is fully set but still ever so slightly tender and vibrant yellow, aim for 10-11 minutes. This avoids the dry, crumbly texture that can result from overcooking.
- 12-13 Minutes: At this timing, you'll achieve a fully set, firm yolk that is evenly cooked through. It's ideal for deviled eggs, chopping into salads, or for those who prefer a completely solid egg. Be careful not to exceed 13 minutes, as prolonged boiling can lead to a dry, sulfurous-smelling yolk with an unappealing greenish-gray ring around the perimeter.
Troubleshooting & Expert Tips for Boiled Eggs
Even with a reliable method, a few extra tips can elevate your boiled egg game from good to absolutely perfect.
- Egg Size Matters: Our timings are based on large eggs. If you're using medium eggs, shave off about 30 seconds to a minute. For extra-large or jumbo eggs, you might need to add 30-60 seconds to the recommended times.
- Don't Overcrowd: Reiterating this point is crucial. Overcrowding a pot not only leads to uneven cooking as eggs jostle for space, but it also lowers the water temperature too significantly, affecting your timings. Cook in batches if necessary.
- Altitude Adjustments: If you live at a high altitude (above 3,000 feet), water boils at a lower temperature. This means you might need to add an extra 1-2 minutes to the cooking times to achieve the same doneness.
- Prevent the Green Ring: The grayish-green ring around a hard-boiled yolk is a harmless but unappetizing result of overcooking, causing sulfur and iron in the egg to react. The best way to prevent this is by strictly adhering to the cooking times and, most importantly, immediately transferring the eggs to an ice bath to halt the cooking process.
- Freshness and Peeling: Fresher eggs tend to be harder to peel because the inner membrane adheres more tightly to the shell. Older eggs (a week or two old) are often easier to peel. Regardless of freshness, the ice bath technique significantly improves peeling ease.
- Storing Boiled Eggs: Hard-boiled eggs, unpeeled, can be stored in the refrigerator for up to one week. Once peeled, consume them within 2-3 days for optimal freshness.
Mastering how long to boil eggs is a fundamental kitchen skill that opens up a world of culinary possibilities. With this comprehensive guide, the days of guesswork are over. By following the simple steps for cooking and immediate cooling, and by understanding the precise timings for soft, medium, and hard yolks, you can confidently produce perfect boiled eggs every single time. So, grab your eggs, set your timer, and enjoy the delicious results!